How to Replace a Volvo Penta Saildrive Bellow: DIY Guide
The Volvo Penta saildrive bellow is one of the most important rubber seals on a saildrive installation. It seals the opening between the saildrive and the hull. If the bellow fails, water can enter the boat quickly.
Volvo Penta recommends replacing the saildrive bellow every 7 years. Even if the rubber still looks fine from the outside, age, salt water, oil, pressure and engine movement can weaken the material over time.
This job must be done with the boat out of the water. If you are not confident with supporting the engine, removing the saildrive or checking the shaft seals, use a marine mechanic.
What You’ll Need
- Socket set, screwdrivers and Allen key set
- Torque wrench
- Loctite or sealant where specified
- Wooden blocks, jack or proper engine support
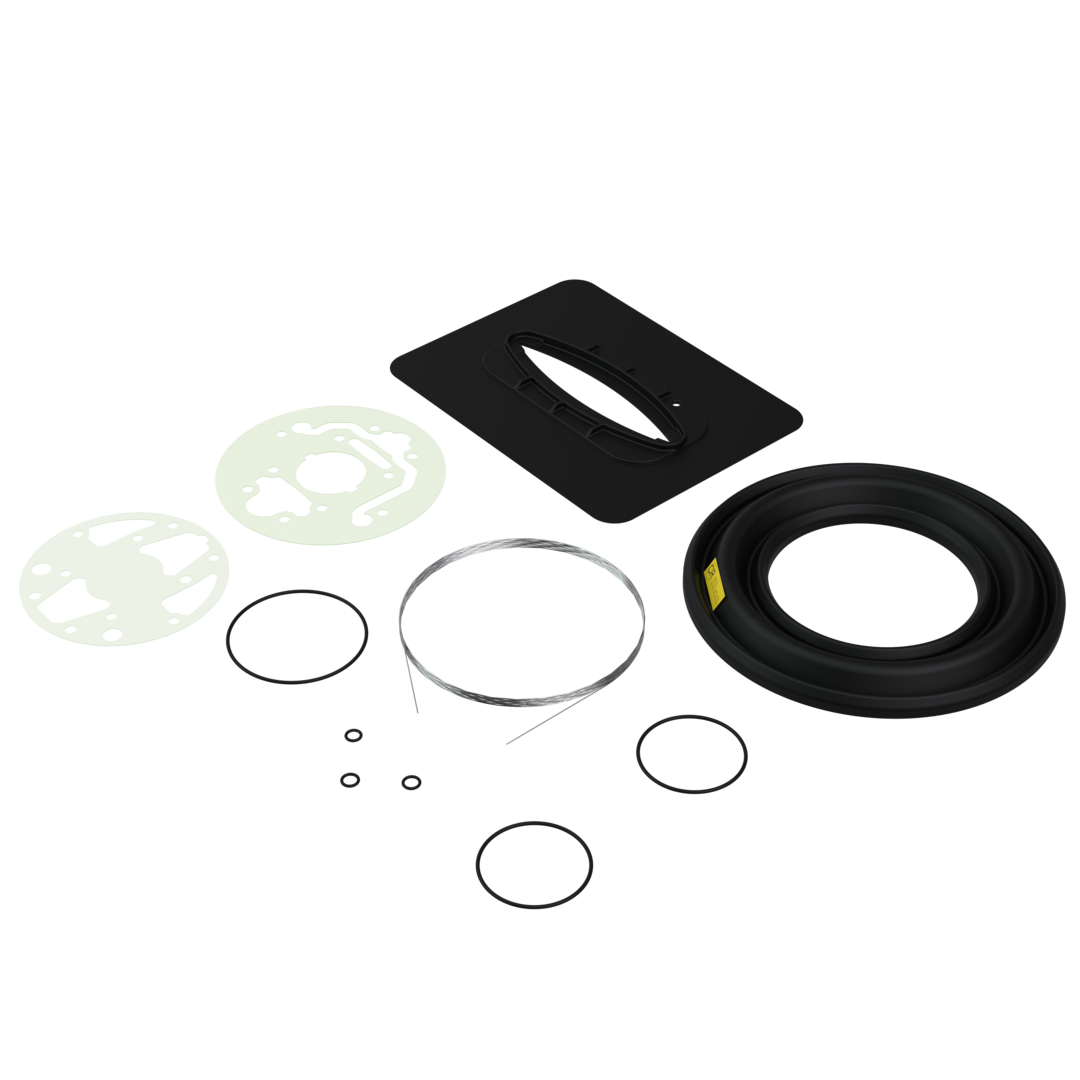
- OEM or high-quality aftermarket Volvo Penta saildrive bellow kit
- New saildrive oil if the oil is drained
Parts You May Need for This Job
-
Saildrive Bellow Kit
Choose between the original Volvo Penta kit or a high-quality aftermarket alternative.
OEM Volvo Penta Saildrive Bellow Kit 21389074
Aftermarket Volvo Penta Saildrive Bellow Kit -
Propeller Shaft Seal
Replace this if the saildrive oil is milky, if water has entered the oil, or if the old seal is worn.
Volvo Penta Saildrive Propeller Shaft Seal 3593663 -
Speedi Sleeve
Use this if the propeller shaft has a worn groove where the seal runs. A new seal on a grooved shaft can still leak.
Prop Shaft Speedi Sleeve for Volvo Penta 120 / 130 / 150 Saildrives
Step-by-Step DIY Guide to Replacing a Volvo Penta Saildrive Bellow
1. Drain the Saildrive Oil
Drain the oil from the saildrive.
Unscrew the dipstick on top of the saildrive to allow the oil to flow out faster.
Check the oil condition. If the oil is milky, water has entered the saildrive and the propeller shaft seal should be replaced.
Assess whether the saildrive can be removed with the lower shaft still installed. If there is not enough clearance, remove the shaft from the housing first.
If the saildrive oil is milky, replace the propeller shaft seal. If the shaft has a worn line or groove where the seal runs, install a Speedi Sleeve before reassembly.
2. Remove the Lower Shaft if Needed
If the saildrive cannot be removed with the lower shaft installed, remove the shaft from the housing. First remove the anode, then unscrew the two Allen bolts from the bearing housing.
Gently tap the bearing housing back and forth to create some space. Use a screwdriver carefully if needed, but do not use excessive force. Avoid damaging the aluminium housing or sealing surfaces.
3. Detach Exhaust Hose, Cables and Hoses
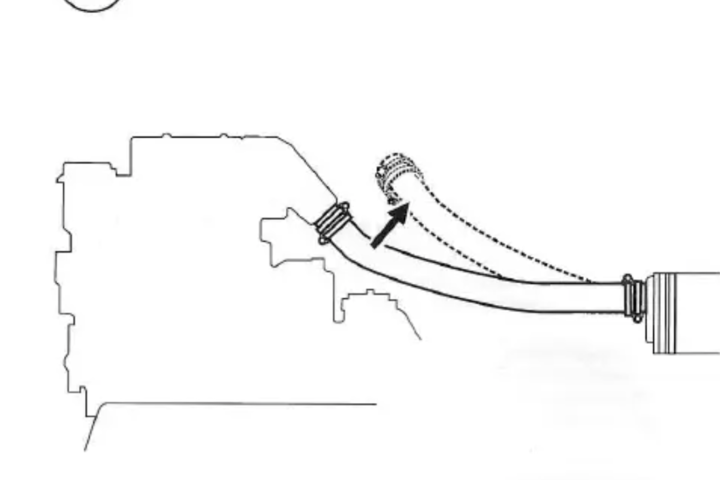
Detach the exhaust hose and set it aside.
Disconnect or move any cables and hoses that may obstruct removal of the saildrive or prevent the engine from moving forward.
Check if your cables and hoses are long enough to allow the engine to move forward by a few centimeters. If not, disconnect them first.
4. Check the Correct Saildrive Diagram

Use the correct diagram for your saildrive model. The procedure differs slightly between 110S, 120S, 130S, 150S and MS25 saildrives.
Before disassembly, take photos of your own setup. This makes reassembly much easier.
5. Disconnect Shift Cables and Cooling Water Hose

Disconnect the shift cables and cooling water hose as shown for your specific saildrive model.
Make sure nothing is still attached that can be pulled tight when the engine or saildrive is moved.
6. Loosen Engine Mounts and Unbolt the Saildrive

Loosen the engine mounts and unbolt the saildrive.
It is usually best to first remove the bolts that secure the saildrive to the engine, while leaving the flange bolts that attach the saildrive to its bed in place for stability during the first steps.
7. Support the Engine and Move It Forward
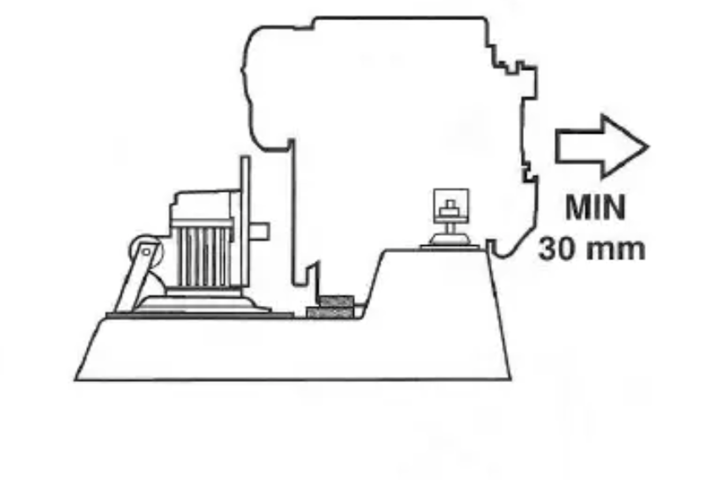
Support the engine with wooden blocks, a jack or suitable lifting equipment.
Move the engine forward as far as safely possible. The more space you create, the easier the saildrive removal and bellow replacement will be.
8. Lift the Saildrive Upwards

Now remove the remaining bolts and lift the saildrive upwards.
This is easiest and safest with two people. Do not let the saildrive hang on the bellow or on connected parts.
9. Undo the Bolts

Undo the bolts carefully and keep all parts organised.
Take photos during disassembly so you can reinstall the parts in the same order.
10A. For 110S and 120S-A Saildrives
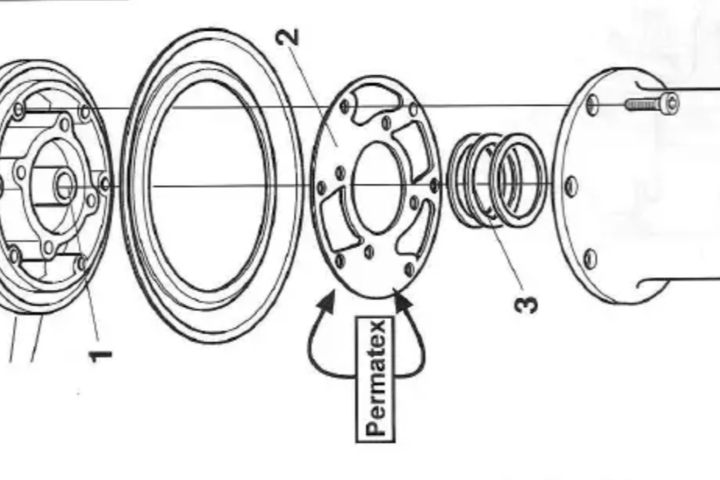
For the 110S and 120S-A, remove the tailpiece after the bolts are removed. You can then remove the old bellow.
Be careful not to lose the three shims.
Clean the gasket and bellow surfaces thoroughly.
Install the gasket in the same orientation as before. Do not reverse it.
Use Permatex when installing the gasket.
Mount the bellow with the year code facing the saildrive seal.
10B. For 120S-B, 120S-C, 120S-D and MS25 Saildrives
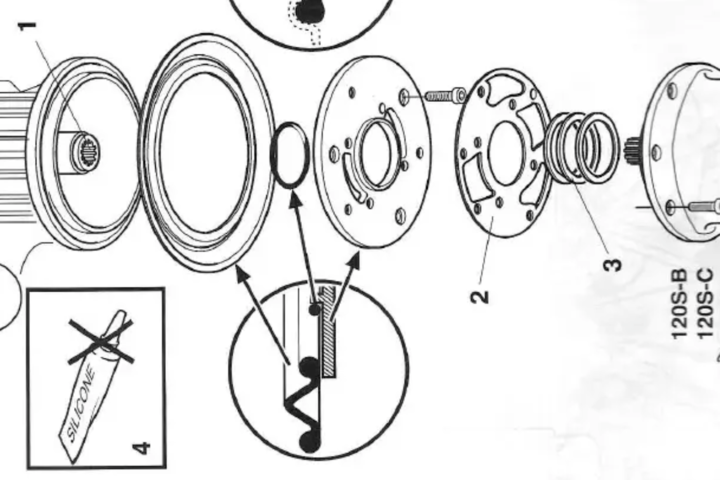
After removing the tailpiece, unscrew the two Allen bolts and remove the intermediate plate.
Note exactly how everything is disassembled. It must be reassembled in the same way with the new materials from the kit.
Clean the gasket and bellow surfaces thoroughly.
Install the gasket in the same orientation as before. Do not reverse it.
Do not use Permatex or similar products on these models.
Mount the bellow with the year code facing the saildrive seal.
10C. For 130S and 150S Saildrives
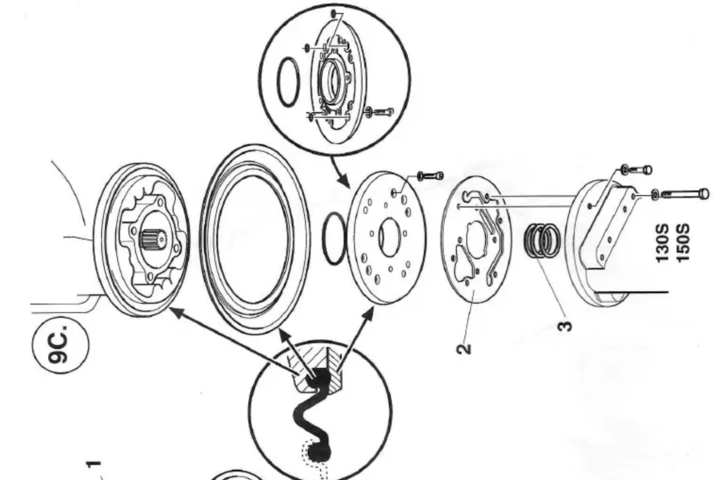
After removing the tailpiece, unscrew the two Allen bolts and remove the intermediate plate.
Keep track of the disassembly order so everything can be reassembled correctly with the new kit materials.
Clean the gasket and bellow surfaces thoroughly.
Install the gasket in the same orientation as before. Do not reverse it.
Do not use Permatex or similar products on these models.
Mount the bellow with the year code facing the saildrive seal.
11. Reassemble the Gasket and O-Rings

Reassemble everything carefully.
Pay close attention to how the gasket and O-rings were originally placed. Reinstall them in the exact same orientation and make sure they are not twisted or reversed.
12. Tighten the Bolts in the Correct Order
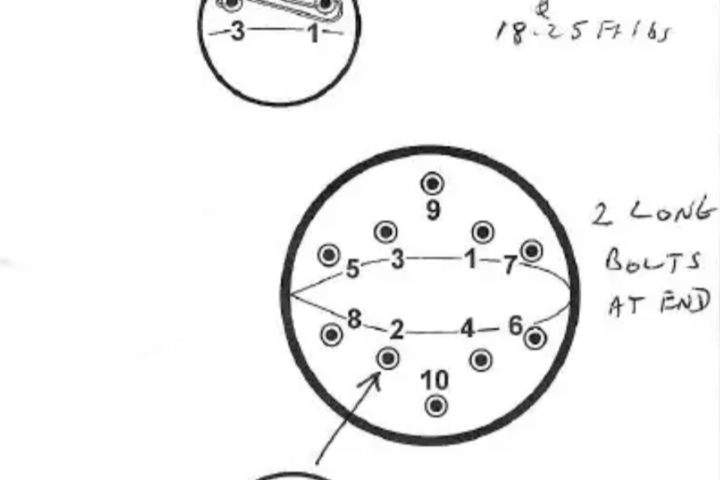
Tighten the bolts from the inside out.
Use the correct torque values from the Volvo Penta workshop manual for your specific saildrive model.
13. Reinstall the Saildrive Plate
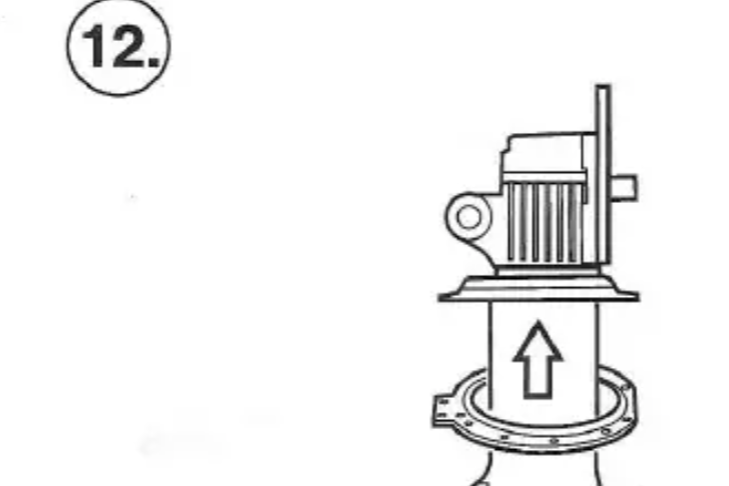
If you have not already reinstalled the saildrive plate, do so now.
You can position it around the tail section and slide it back into place.
14. Place the Saildrive Back Into the Hull Opening
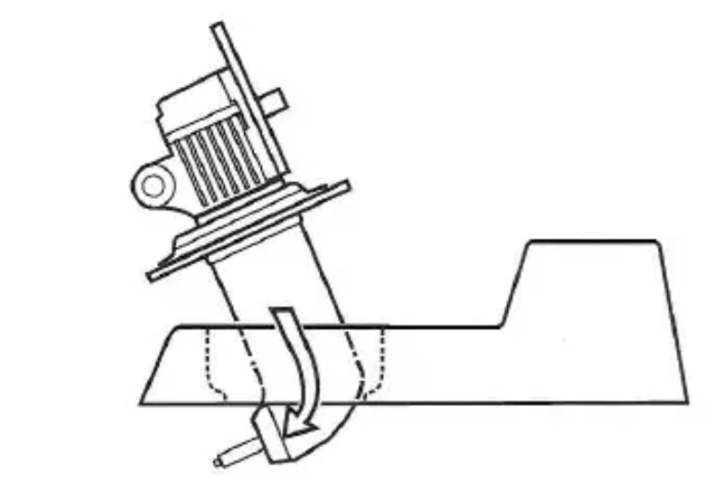
Place the saildrive back into the opening from which it was removed.
Make sure it is properly aligned and securely positioned before tightening everything.
15. Align the Holes Correctly
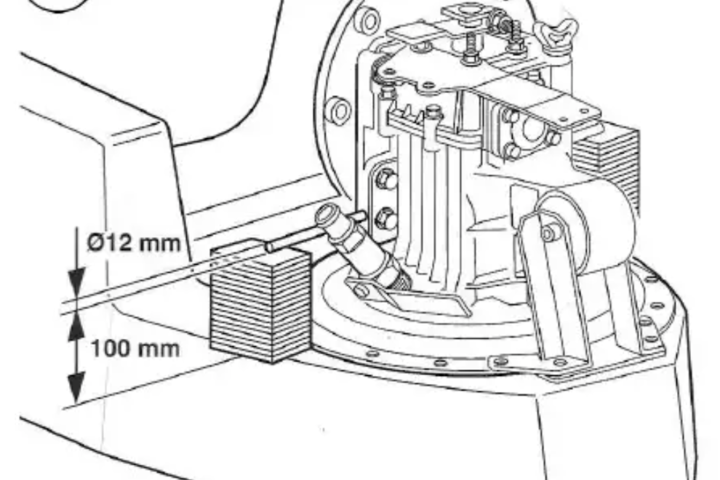
The image shows a setup that helps align the holes when reinstalling the saildrive.
This can be tricky because the bellow can slip while positioning the saildrive.
Another option is to work with two people: one person holds the saildrive from under the boat while the other tightens the bolts from inside.
16. Grease the Shaft Before Assembly

Once the saildrive is securely in place, apply grease to the shaft.
This helps with smooth assembly and reduces wear during installation.
17. Slide the Engine Back Into Position
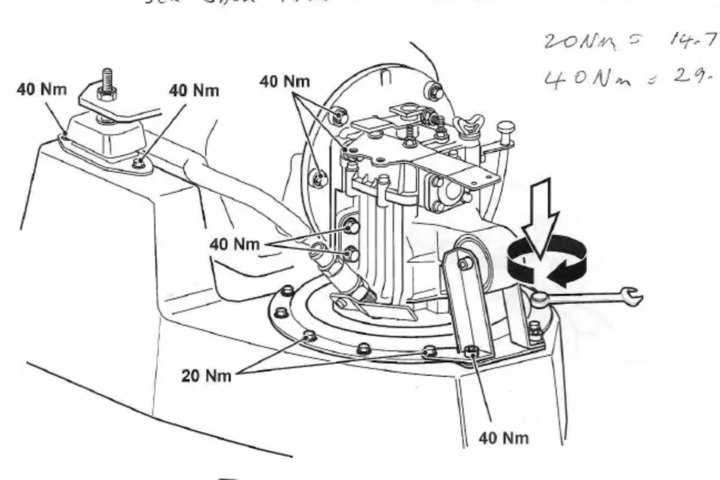
Slide the engine back into position.
Rotate the crankshaft slightly back and forth to help the saildrive align with the damper plate splines. This can take some patience.
Once aligned, tighten all bolts securely to the correct specification.
18. Reconnect Hoses, Cables and Exhaust
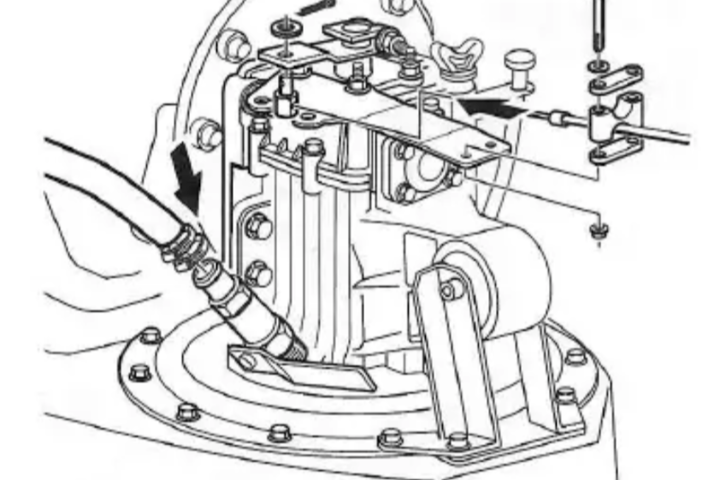
Reconnect the shift cables, electrical cables, cooling water hoses and exhaust hose.
Make sure everything is securely connected, properly routed and not under tension.
19. Reinstall the Shaft or Drain Plug
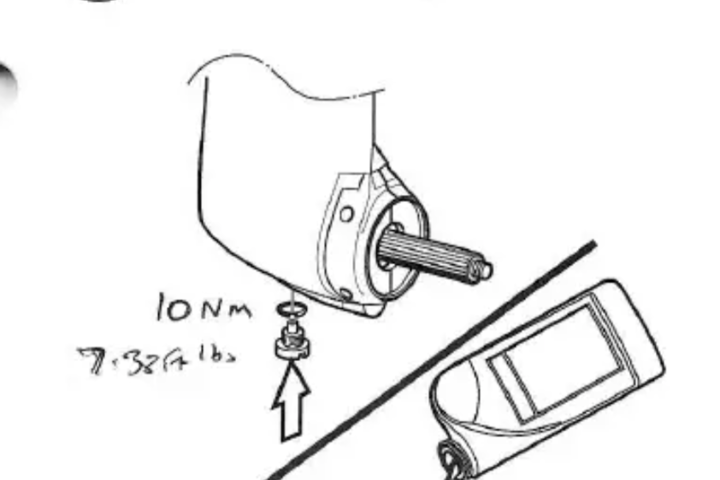
Reinstall the shaft or the drain plug, depending on what you removed.
If you removed the shaft, it is advisable to replace the seals in and around the bearing housing.
Inspect the shaft for wear, especially where the seals run. If there is a groove, use a Speedi Sleeve.
20. Fill the Saildrive with the Correct Oil

Fill the saildrive with the correct oil.
Use the oil type and quantity specified for your saildrive model. After filling, check the oil level again after a short period.
21. Reinstall the Final Rubber Part
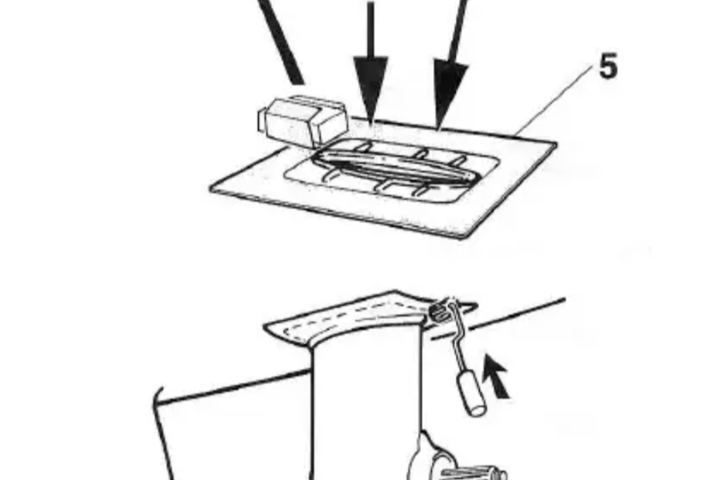
Reinstall the final rubber part if you removed it or if it is in poor condition.
Check that everything is seated correctly before launching the boat.
Check the bellow position, clamp position, saildrive oil level, shaft seal area, shift operation, hoses, cables and all fasteners. After launching, inspect the saildrive area immediately for leaks.
OEM or Aftermarket Bellow Kit?
You can use either the original Volvo Penta saildrive bellow kit or a high-quality aftermarket kit. The OEM kit is the original Volvo Penta option. The aftermarket kit is a more affordable alternative for the same saildrive application.
Always check the saildrive model and part number before ordering. If you are unsure, contact us with your engine model, saildrive model or old part number.
Need the Correct Saildrive Bellow Kit?
We supply OEM and high-quality aftermarket Volvo Penta saildrive bellow kits, plus propeller shaft seals and Speedi Sleeves for common Volvo Penta saildrives.
FAQs
How often should a Volvo Penta saildrive bellow be replaced?
Volvo Penta recommends replacing the saildrive bellow every 7 years.
Can I replace the saildrive bellow myself?
Yes, if you have the correct tools, enough technical experience and a safe way to support or move the engine. If you are not sure, use a marine mechanic.
Should I replace the propeller shaft seal at the same time?
If the saildrive oil is milky, if water has entered the oil, or if the seal is old, the propeller shaft seal should be replaced.
When do I need a Speedi Sleeve?
You need a Speedi Sleeve if the propeller shaft has a worn groove where the shaft seal runs. A new seal may not seal properly on a damaged shaft surface.
Can the bellow be replaced while the boat is in the water?
No. The boat must be out of the water before replacing the saildrive bellow.
Leave a Reply